|
|

QUICK REFERENCES
Inventory Manager
Customer Support:support@pminder.com
Toll Free: (800) 743-5820 ;
Local: (408) 243-5820;
Fax: (408) 243-5825
|
|  |
| What can I do with Inventory Manager?
The PropertyMinder system uploads your featured and office listings automatically.
- Add listings and properties that you may not have put on the MLS (pocket listings, exclusives, rentals etc) to the "Featured Listings" page on your website. You may even want to add homes you have sold in the past.
- Load your featured listing from the MLS.
- Update (edit) listing information.
- Create the photo album - add more photos to your featured listing. Sort the listing photos.
- Add a virtual tour, if applicable.
- Add any custom link to your featured listing. This feature is used to provide title reports, disclosures, etc online.
- Hide/show address and map of the property.
- Hide/show the hit counter tracking the number of people who viewed your featured listing.
How can I add a Listing/Property manually to the website?
- Login to your Toolkit and go to Inventory Manager.
- Click on the Add New Listing Manually button.
- Add a Photo to a Listing/Property.
Click on the Browse button to locate the image on your computer.
Locate the file/directory.
Double click on the file you want to use. If you can't see your file above, try changing the Files of type: to All Files (*.*).
Click on the Upload Photo button.
- Add more photos.
- Add "Virtual Tour Link" to a Listing/Property. Name the link and paste the web address (URL).
- You can add the custom link that will show Disclosers, specific area reports or anything you want. Name the link and put web address (URL).
- Add General Information (the required fields are marked in red).
- Type an attention grabbing description for the property in the "Description" field.
- Add "Property Features". You may check as many features as you want.
- Click on the Submit button to add the new Listing/Property to your personal website.
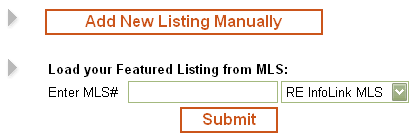
How can I load the Listing from MLS?
- Login to your Toolkit and go to the Inventory Manager.
- Type in the MLS number in the Load your Featured Listing from MLS input box.
- Click Submit.
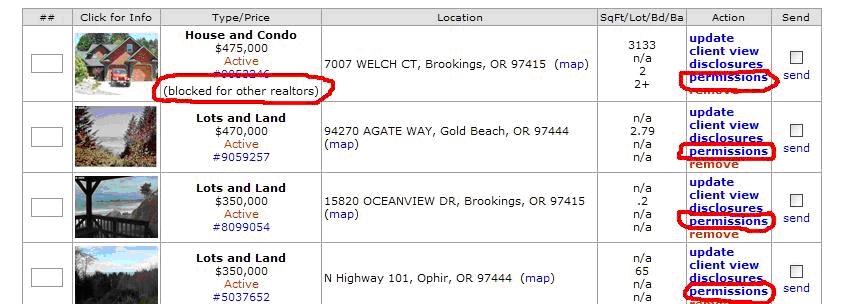
How do I block other PropertyMinder users from listing my properties?
You can block listings from appearing on other PropertyMinder subscribers' websites.
- Login to your Toolkit and go to the Inventory Manager.
- Next to the listing, click Permissions.
- 3. On the Edit Listing Permissions page, select your option. If you select to block the listing from other PropertyMinder users, they cannot add it onto their websites. Furthermore, if this listing is already added onto their site, it will get deleted.
How can I update a Listing extracted from the MLS?

To Update listing information click on the Update link on right side of the Listing table. You can make the following changes to listings that have been extracted from the MLS either automatically, or that have been loaded from the MLS:
- Change/update the main picture.
- Add additional photos: create a photo album by clicking the photo album: link.
- Add/update the virtual tour link.
- Add a custom link for the listing.
- Modify the description of the listing using the HTML editor, which allows you to add links and format the description.
- Select hide address, include map, or show the hit counter.

- Click Submit to save changes.
How can I remove a listing from the Inventory Manager?
To Remove a Property from the Listing table click on the Remove link on right side of the Listing table.
 WARNING! All "Removed" listings are permanently removed. WARNING! All "Removed" listings are permanently removed.
How can I prepare a Listing/Property photo for the web?
- We recommend that you start by creating a file/directory on your computer called "My Listings".
- Save ALL your images in this file/directory so that they will be easily accessible when you are ready to upload them to your website.
- Before you can add photos to the website, please prepare and save them in the proper format:
Dimension:
320 pixels (4.444") - WIDTH
240 pixels (3.333") - HEIGHT
Resolution: 72 dpi (dots per inch)
File Type: JPEG (jpg)
You can change the size of the picture yourself using the Paint (Microsoft Windows Paint) application. If you have a relatively new version of windows you should have it on your computer. Windows 2000, ME and XP have it.
To change the size of the picture yourself:
- On the bottom left corner of your screen, go to Start > Programs > Accessories > Paint.
The paint application will open on your screen.
- In Paint, click on File and select Open.
- In the Open dialog box change the value for "Files of Type" to JPEG (or the type of file that you have, it might be Bitmap, GIF, JPG). If you do not have this option for "Files of Type" then your windows is too old.
- Navigate to the place on file system where the file is saved and open it. You should see your picture occupying a large portion of the screen.
- Click on Image (menu item) and select Stretch/Skew...
- On the opened dialog box change Stretch values to be less than 100%. We suggest that you start with 50% and then change it if needed.
NOTE: Till you save the file, nothing will be changed, so you can experiment with it. Try to get your picture to the size when it is about the size you would like to see on your website.
- Use "Save As:" (Under File menu) instead of Save. Using "Save As:" will keep your original picture unchanged but will create a new file of a smaller size.
NOTE: Make sure that the "Save as type" box shows the file type as
JPEG. Select a name for it and save it.
How can I create a photo album (add multiple pictures)?
- Click the update link corresponding to the desired property.
- Click the photo album... link on the property editor.
- On the Photo Album screen, click the browse button to find and select the file with the picture image.
- Label the image (description of the image).
- Click the Upload picture and description button.
- Repeat these steps as many times as required.
How can I change the order of my Featured Listings?
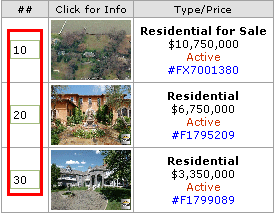
- Go to the Inventory Manager.
- Use the first blank field (##) to order the listings in increments of 10.
- Click the save listings order (##) link above or below listings table.
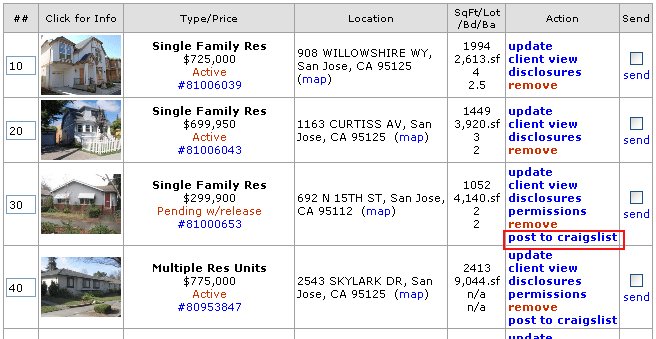
How do I post my listings to Craiglist?
With PropertyMinder's AccelerAd, you can easily post your listings on Craigslist. This will help your listing and website gain more visibility online. If you are new to Craigslist, we recommend creating your own free account at https://accounts.craigslist.org. All of your Craigslist posts will be saved under this account, so that you can keep track of them in one place. Please visit //www.craigslist.org/about/terms.of.use and see Craigslist's Terms of Use for information about posting advertisements on Craigslist.
To post your listing to Craigslist:
- Login to your Toolkit and go to the Inventory Manager.
- Next to the listing, click Post to Craiglist.
- Enter your Craigslist email login.
- Choose the Area/City. Always double check the City/Area that the post is being entered under. For some larger metropolitan areas such as SF Bay Area CA and Los Angeles CA, Craigslist has split up these areas into smaller markets. Make sure that you choose the correct one.
- After selecting the correct city/area, pressing Submit will direct you to the Craigslist post area. You will see the Craigslist advertisement as potential buyers would see it. All the information regarding the property will be pulled automatically. Review the ad and if ready, press Continue and follow the prompts to finish the posting. If you want to make changes to your ad (for example, create an attractive title), use the Edit button.
- To see how many visitors/hits were received from your AccelerAds, visit the Hits Tracking area in the Toolkit. Our tracking tool will let you know how many visitors came to your website and which website they found you through. After clicking on Hits Tracking, click on the Search Engines/Referrers tab, then All Referring Sites.
How can I create different lists of properties?
You can create different lists of properties and put them on specific pages of your website. Just pick the MLS property ID #'s or import the properties from your Featured Listings, name the page, and you will quickly have pages dedicated to different niches.
Hint: make pages for luxury homes, REOs, short sales, rentals.
To create your list of properties:
- Login to your Toolkit and go to the Inventory Manager.
- Click on Hot Lists near the top.
- Click on New Group.
- See image below for editable fields.
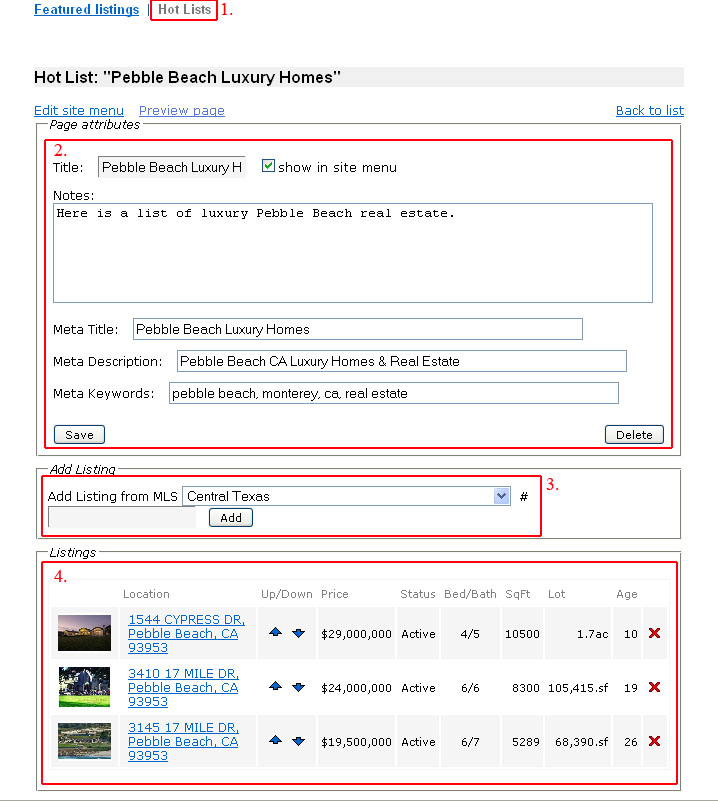
- Add Title to the Hot List - This will be the same text that shows up on the actual page of listings.
-
Notes field - Add a sentence or two regarding the list. Maybe it's a list for REOs, luxury homes, listings in a certain neighborhood, etc.
Meta Title: Title for the page which will show up on the browser/search engine results page.
Meta Description: A sentence about the page that is viewable on the search engine results page.
Meta Keywords: words that a person would type into the search engine fields.
- Add Listing: Enter the MLS property id # and press Add, for some agents, pick the MLS for that property. You can also add any of your Featured Listings to the page. Click the "Start Import" button under "Add Featured Listings" and check off the properties you would like to add.
- Sort the order of the listing or delete it from the list.
- After adding the listings, you can preview the page. Make sure to select "Show in Site Menu" to have it activated on the website. "Edit Site Menu" will take you to the menu for editing the order of the page on the navigation bar.
What is a disclosure package?
These are documents such as existing contracts, government forms, various inspection reports, lists of exceptions (e.g. lack of permit, violations, etc.), liens and more that pertains to the property for sale. They are mostly in pdf formats when hosted online as they are considered as protected documents. The listing agent has the authority to permit access to an individual.
How can I add disclosure documents to the listing?
- Login to your Toolkit.
- Click Inventory Manager.
- Find the listing and click on the disclosures link under the Action column.

- On the next page, click Browse and upload your document.
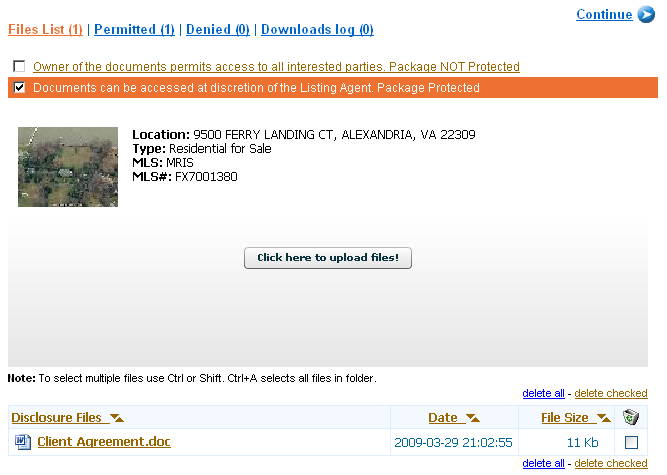
- After clicking the Upload button, you will see a system notice. By default, all your documents are protected. You may also make them public by checking the appropriate checkbox as shown below.

- When some one tries to download a disclosure document and you chose to protect your documents as shown in the example above, your site visitor is forced to leave an email. You will receive a notification email with this visitor's information. If you decide to grant the access, click on the Permit link. You will be directed to login to your Toolkit and you'll see a permission page where you can see the visitor's information. Same directions apply if you deny the document access.
How can I grant document access to my client without checking my email notification?
- Login to your Toolkit. Click Inventory Manager.
- Look for your listing. Click on Disclosures link under the Action column.
- Click on Permitted link.
- In the drop down menu, chose the client and click Permit. You may also notify your client by clicking the checkbox Notify client.
How can I deny access to these documents without checking my email notification?
- Login to your Toolkit.Click Inventory Manager.
- Look for your listing. Click on Disclosures link under the Action column.
- Click on Denied link.
- In the drop down menu, chose the client and click Deny. You may also notify your client by clicking the checkbox Notify client.
How can I see who downloaded my disclosure documents?
- Login to your Toolkit.Click Inventory Manager.
- Look for your listing. Click on Disclosures link under the Action column.
- Click on Download Logs link to see who downloaded your documents.
|
|
TOP
|
|