|
|

QUICK REFERENCES
Website Editor (frameless)
Customer Support:support@pminder.com
Toll Free: (800) 743-5820 ;
Local: (408) 243-5820;
Fax: (408) 243-5825
|
|  |
| What can I do with the Website Editor?
The website editor page allows you to:
• Upload your own photo.
• Add/edit your slogan.
• Choose/change your website homepage design.
• Choose your banner and images from our gallery or upload your own..
• Add/edit your resume/profile ("About Me").
• Add links from your site to other websites.
• Change the order of links on your website.
• Add/edit your personal custom pages.
• Add/edit your personal lead capture pages.
• Enable, disable or customize the "Auto Lead Capture" window.
• Modify the website Meta Tags.
• Create your own list of utilities.
How can I add or change my photo?
- Log in to the Toolkit.
- Click Website Editor on the left panel of the Toolkit screen.
- Select My Photo & Logo icon.
- Browse for the photo in your computer and upload it. The page will give you the correct image size.
- You may delete the photos by clicking Remove.
How can I change the design, style or the color scheme of my website?
You can change your website design yourself at any time.
- Log in to the Toolkit.
- Click Website Editor on the left panel of the Toolkit screen.
- In the Website Designer section, view and select from the available color schemes. Click any color square to view the designs within that color. You can choose from the following formats:
• Left Navigation - your buttons or links will appear on the left hand side of your homepage.
• Top Navigation - suggested if you have many buttons. The links will appear across the top of the homepage.
• Featured Listings - your homepage will display your listings in a slideshow format.
• Standard Design - will show a still photo on your homepage.
• Animated Design - will create a slideshow of scenic images on your homepage.
- Click Next to choose your images, depending on which format was selected.
- In the "Standard Designs" or "Animated Designs" drop down box, find and select the reference number and name of the design you like.
- You have an option to show the text footer on your homepage or not. You can customize the text by simply clicking the link "change" right next to the Show Footer checkbox.
- You can preview your design or simply hit save to finish.
Can I add my own animated/flash file to my home page?
Yes, you can. This feature is available only for Animated Designs. We advice you to use pictures that are 312*200 pixels in creating your Flash (.swf) file. If the dimensions are bigger than what is advised, our flash loader will automatically resize your file.
Please do not upload large files. It will slow down your website's load time.
- To upload you own Flash .swf file login to the Toolkit.
- Click on the Website Editor link on the left side of the screen.
- Select Website Designer.
- Choose any of the animated designs and click Next.
- On the next screen, click Upload Custom Animation.
- Browse for the .swf file and upload it.
- Click Upload and check your website.
What is the HomeScape theme?
HomeScape theme is a new layout for your website. This new theme features a quick MLS search on the homepage, a top navigation menu, quick links, editable rotating photos and featured listings thumbnails on the homepage.
Send an email to support@propertyminder.com to switch your design to this new layout.
How can I adjust the settings of the HomeScape layout?
Once your website layout gets switched to HomeScape, you may customize your design settings.
To do this:
- Login to your Toolkit and click on the Website Editor link on the left side of the screen.
- Select Website Designer.
- Within the Custom Appearance tab, click on the thumbnail of HomeScape layout and click the Select button.
- Click on the Website Designer icon again and then click the Colors & Settings button.
- Select your color theme.
- Edit Header Buttons. These are your top navigation buttons. You can choose up to 5 from your existing website buttons and edit their titles. To modify the button click on it and then press the Edit button. To change the order of buttons move them using Up and Down buttons.
- Edit MLS settings. Choose the MLS, default state and county for quick MLS search shortcut on the home page.
-
Featured Listings. Choose the maximum number of listings for featured listings grid on home page.
-
Banner settings. To select the pictures for front page animation click the Change Slides button. You can either choose the slides from the PropertyMinder media library or upload your own images.
- To choose from the media library, click on the Show tags filter button to simplify your search. Now check off the desired category and select images. You can check more than one category, to uncheck them all at once use the Uncheck All button.
- To upload your own photos go to the Custom files management tab. You can upload image files from your computer. Uploaded photos will be available to select/deselect from Custom Files tab.
View currently selected items on the bottom of the screen and if you wish, change the order of images using arrow buttons. Click OK when you are done.
 NOTE: We recommend that you select no more than 5-6 images to avoid slow homepage load time. NOTE: We recommend that you select no more than 5-6 images to avoid slow homepage load time.
- Edit Quick Links. These are quick navigation links, which appear on your homepage near the MLS search form. You can choose up to 3 from your existing website buttons and edit their titles and brief descriptions. To modify the button click on it and then press the Edit button. To change the order of buttons move them using the Up and Down buttons.
- Click on the Save button when finished.
- Now you may want to edit website footer. To do that, go to Footer Settings tab of Website Designer and make the necessary changes.
I was switched to HomeScape layout, but now I want to return to my previous design. How can I do it?
PropertyMinder standard design portfolio is still available for you on the Standard Appearance tab of Website Designer. Please keep in mind that website customization settings will clear every time you switch between HomeScape and standard appearance.
NOTE: If you previously had our framed design, you will not be able to return to your previous layout; however you can choose from our standard frameless design portfolio.
How do I set up a custom home page?
With the AccelerAgent Website, you have the ability to set up your own home page.
To do this:
- Login to your Toolkit.
- Click Website Editor on the left panel and then click the Buttons page.
- Click on the Custom Files Management link.
- Upload your index.html file in the "htdocs folder". You can name this index.html file as you wish, but you should ask PropertyMinder Customer Support to change your home page URL to //YourDomainName/FileName.html.
If you have *.css file, upload it in the "htdocs folder" folder, too.

- Upload all your custom homepage images to "images folder".

Your custom home page is now set up.
Please note that we do not keep any backup or copies of your custom home page files. If you delete them, we will not be able to recover these files.
How can I create and edit the "About Me" page?
- Login to the Toolkit.
- Click on the Website Editor link on the left side of the screen.
- Click on the About Me icon.
The About Me feature is a professional editing tool. It allows you to add text, insert images, add links, change font colors, text sizes, background colors, links, and much more. It is fun and easy.

To make formatting changes to the "About Me" text in the Website Editor:
- Select/highlight the text.
- Click the appropriate icon (bold, italics, font size, background, color, cut and paste) from the top bar of the editor for the desired operation. When you move the pointer over the icon in the toolbar, the action associated with that icon will appear.
- Click the Save button at the bottom of the page to save changes.
How can I add custom pages to my website?
You can create and add unlimited Custom Pages to your website. A Custom Page is one that you create yourself. This will show as a link to your website.
To add a new custom page:
- Login to the Toolkit
- Click on the Website Editor link on the left side of the screen.
- Click on the Buttons icon.
- Click on Create Custom Page link.
- Name your button
NOTE: You are now given a list of all the buttons on your website. This is where you can enable, disable and erase your links.

- Type in your text, change the format, add images and more.
- Click Save to finish. Your button will now appear at the end of your list. You need to click Enable to activate it on your website
- You can change the sequence of your links or buttons on the website by simply clicking on the button number and changing it.
To add an HTML page:
- Login to the Toolkit.
- Click on the Website Editor link on the left side of the screen.
- Click on the Buttons icon.
- Click on Create Custom Page.
- Click on Source link.
- Name your page and type in your text inserting appropriate HTML tags.
- Click Save to finish.
NOTE: Our editor recognizes basic HTML tags.
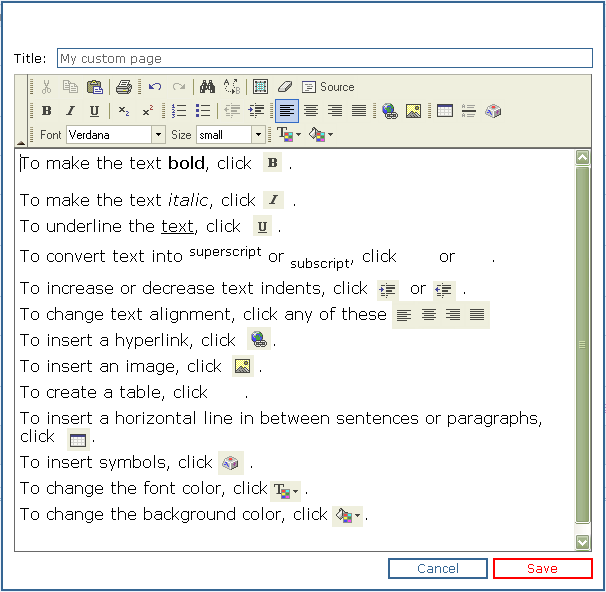
What do the icons in the custom page window mean?
What can I do with the Custom Files Manager?
The Customs Files Manager allows you to upload, store and organize files and images before you insert them into a custom page.
To add a file to the Custom Files Management
- Click Website editor on the left panel of the Toolkit page.
- Click on the Buttons icon.
- Click the Custom Files Management link.
- On the Custom Files Manager window, go to the main folder section if you are uploading a document or go to the image folder section if you are uploading a photo. Click the Browse button and choose the location of the file from your local computer.
- After selecting the file, click Add File to add the file to the "Custom Files Manager".
- To delete a file, click the trashcan icon next to the file.
- The file is now saved on the "Custom Files Manager". You can now insert the image file into the Custom Pages, About Me, or in any messages that you would like to send out to your clients within the PropertyMinder CRM.

How can I add a link to a file saved on my local computer?
You can upload a non-image file to the custom file manager in the main folder and then add a link/button to the file on your website. To do this:
- Click Website Editor on the left panel of the Toolkit. Click on the Buttons icon.
- Click the Custom Files Management link.
- In the window that appears, in the Main folder section, click the Browse button and choose the location of the file from your local computer.
- After selecting the file, click Add File to add the file to the Custom Files Manager.
- To delete a file, click the trashcan next to the file.
- The file is now saved in "Custom Files Management". You can now click the get URL link next to the file name.

- This will bring up a small window with a link to the saved file.

- Copy the link from the window, return to the "Buttons" page.
- Click the Add New Link button. Name your link. Paste the URL link that you copied from your Custom Files Manager into the URL box as shown below. Be sure not to duplicate the "http://" string!

- Click Save to finish. Your button will now appear at the end of your list. You need to click Enable to activate it on your website.
- Specify the order of your buttons or links by entering an appropriate number.
- Go to your website homepage and test the link by clicking the name of the button/link.
How can I add a custom link on my website?
You can add as many links to your website as you like. These links will be shown on your website in the order you specify (ascending order).
To add a new link:
- Login to the Toolkit. Click on Website Editor on the left hand side of the screen.
- Click on the Buttons icon.
- Click the Add New Link button. Name your link. Put the website address of the site you wish to link to, into the URL box as shown below. Be sure not to duplicate the http:// string.
- Click Save to finish. Your button will now appear at the end of your list. You need to click Enable to activate it on your website.
- Specify the order of your buttons or links by entering an appropriate number.
How can I add my own lead capture form?
- Login to the Toolkit. Click on Website Editor on the left hand side of the screen.
- Click on the Buttons icon
- Click on Create Lead Capture Form link
- Name your custom page. This will be the title of your button on the website.

- You can edit all of the text in this form by simply highlighting the text and typing over it.
-
Bind input fields to contact will automatically add the people who filled out the form into your CRM. You just need to specify which fields to pull and transfer to your CRM.
- You can edit the email that the people get after filling out your form and you can also customize the thank you page on your website, which is what they see after they fill out the form.
My Lead Auto Capture box is not appearing anymore, what happened?
The Auto Lead capture tool uses cookies. When a client goes to the site the first time and clicks on the Auto Lead capture box, the site will place a cookie on their computer to note that they have logged in before. To re-enable the drop down box, the user will need to delete the cookies from the Internet Explorer cache.
How can I customize the Auto Lead Capture window?
The lead auto capture window has been designed as a layered screen that slides down onto your homepage when a new visitor comes to your home page. Since the window is not a pop-up but a layer, it does not negatively impact your website with regard to search engines and PPC services like Google Adwords.
- Click the Website Editor button on the left panel of the Toolkit.
- Select the Special Promotion icon.

- Select background color of the window. Choose from predefined colors or click on the Custom color button to select your own tone.
- To edit the text message, click on the message area and type over the existing text. Note that you can also change the headline of your promotion box.
- You can choose the display options of this auto lead capture. Here are the available options:
• Simple mode (applies user's mail client to get his contact info)
• Capture form mode (applies information typed by user)
• Disable Auto Lead Capture
- On the Welcome email message tab, you can customize the email that will go out to your web visitor.
- Click Save changes to finish.
How can I modify the welcome message that is sent out to all captured visitors?
- Login to your Toolkit.
- Click Website Editor on the left navigation panel.
- Open Special Promotion page.
- Click on the Welcome email message tab. You will see a Welcome message editor. Modify the subject, message text and click Save changes.

What are my Search Engine Optimization (SEO) options?
Search Engine Optimization (SEO) is the process of increasing the amount of visitors to a website by improving the visibility of a website in search engines.
SEO tools that are available on your website include:
- Sitemap XML file: a directory of all available pages.
- Meta tags on each individual page including listing details pages
- Individual page permalinks: editable search engine friendly URLs
How can I use sitemap XML file to make my website more search engine friendly?
A Sitemap is an XML file that lists all the URLs for a site. It is an easy way to inform search engines about pages on a site that are available for indexing.
Your PropertyMinder website allows you to submit sitemap file to Google, Yahoo, Bing, and Ask so that the website pages get indexed by those major search engines.
To do that:
- Click Website Editor on the left panel of the Toolkit screen.
- Select the Search Engine Optimization icon.
- On the top of the page you can see your sitemap URL and the list of available search engines. Click on the each search engine in turn to submit your sitemap file.
What are website Meta Tags?
A Meta Tag describes some aspects of the contents of a web page. The information that you provide in a Meta Tag is used by search engines to index a page so that someone searching on the Internet for content contained in your website will be able to find it. The Meta Tag is placed near the top of the HTML in a Web page as part of the heading.
• All your most important key phrases should be in the TITLE tag. Look at your key phrases, make a list of all the important words, and create a title tag that uses them. Also, keep in mind that browsers only display the first few words of a title tag. The first sentence of your title tag should be easy to read and understand.
• The Keywords Meta Tag lists the words or phrases that best describe the contents of the web page.
• The Description Meta Tag includes a brief (one or two sentences) description of the page.
NOTE: The title, keyword and description tag are used by search engines to index your website page and assign a position based on their relevancy to the search query (keyword).
• Additional head content will contain any additional scripts or meta tags which will be placed into HEAD section of your website's HTML code. A good example is the Google™ Analytics verification script.
How can I change my website Meta Tags?
Agents, who are comfortable manipulating keywords, site titles, and Meta Tags, can make these changes through the SEO editor. Typically, the document which contains the most keywords searched and relevant to the website content is classified by the search engine as the most popular and will be selected as the "best match".
To change your homepage and listing details pages Meta Tags:
- Click Website Editor on the left panel of the Toolkit screen.
- Select the Search Engine Optimization icon.
- For homepage: add or update the words in the Home Title, Home Description and Home Keywords fields.
- For listing details pages: add or update the words in the Property Details Title, Property Details Description and Property Details Keywords fields. These title, description and keywords will be common for all Property Details popup windows. To create specific meta tags for different properties use the constructions listed above the Property Details section.
For example: You would like to set common property description like "Beautiful townhouse with 3 bedrooms and 2 bathrooms in Sacramento CA". In this case you should type in Property Details Description field "Beautiful {:property_type} with {:bed} bedrooms and {:bath} bathrooms in {:city} {:state}"
- Click Save button when finished.
To change all your other website pages Meta Tags:
- Click Website Editor on the left panel of the Toolkit screen.
- Select the Buttons icon.
- Click Edit Name/SEO link near the desired button.
- Add or update the words in the SEO Title, SEO Description and Keywords fields.
- Click Save button when finished.
How can I create search engine friendly URLs for my website pages?
Each individual page of your website can have its own editable URL after the .com. This option allows you to make your website URLs more search engine friendly and also more human readable/memorizable.
To edit your website pages URLs:
- Click Website Editor on the left panel of the Toolkit screen.
- Select the Buttons icon.
- Click Edit Name/SEO link near the desired button.
- In the Permalink field update the part of page's URL after the ".com/"
- Click Save button when finished.
How do I modify my slogan?
- Click Website Editor on the left panel of the Toolkit screen.
- Select the My Slogan icon.
- Type in your text within the slogan window. You can format the text however you want it.
- Click Save.
How do I add my own list of utility companies?
- Click Website Editor on the left panel of the Toolkit screen.
- Select the Switch Utilities icon.
- Add the utility company's information including phone number and website address. Their information will appear on your Switch Utilities page on the website.
- To make changes, click on the Edit link on the right. Click on the garbage icon to delete an entry.
How can I add video/audio to my website?
- To add a video file to your website you should first register on any online video portals like YouTube.
- Upload your file.
- Get the html code of your file.
- Login to your Toolkit.
- Go to Website Editor.
- Click Create Custom Page button.
- On the editor window click Source button and insert the html code.

- Click Save.
Do not forget to enable you new custom page. Your button will now appear at the end of your list. You need to click Enable to activate it on your website.
How can I add a Blog to my PropertyMinder site?
PropertyMinder websites allow you to add a blog link to your site.
PropertyMinder does not provide actual blog hosting, so you will need to find an external site that allows you to create and host a blog.
Some examples are www.livejournal.com, www.blogdrive.com, or www.activerain.com.
These sites are only provided as examples, we do recommend that you research the sites and find the blog hosting site that best suits your needs.
Once you have found a blog host that you like, you will need to setup an account with them. After your account is setup, you will receive your blog URL.
- You will then need to login to your Toolkit.
- Go to the Website Editor.
- Click Buttons link.
- Click the Add New Link button. Name your link. Put the URL of your blog into the box as shown below. Be sure not to duplicate the // string.
- Click Save to finish. Your button will now appear at the end of your list. You need to click Enable to activate it on your website.
- Specify the order of your buttons or links by entering an appropriate number.
How do I change the text within the blue header bar on Internet Explorer?
- Login to your Toolkit and select Website Editor.
- Click Meta Tags. To update the blue header bar on Internet Explorer, you will need to update the Title field

- Click Save.
How do I edit the text at the bottom of my homepage?
- Login to your Toolkit and click Website Editor on the left navigation panel.
- Open Website Desgner page.
- On the next page click the check box Show Footer if you want to enable the bottom text. If you want to edit the text click Change link.

- Make you changes to the text in the editor window and click Save.
- Click Preview or Save again.
You can also insert simple web widgets to that area or embeded video.
How do I insert a link within the text of my homepage?
To insert a hyperlink within your homepage text:
- Login to your Toolkit and select Website Editor.
- Click no Website Designer and hit Next.
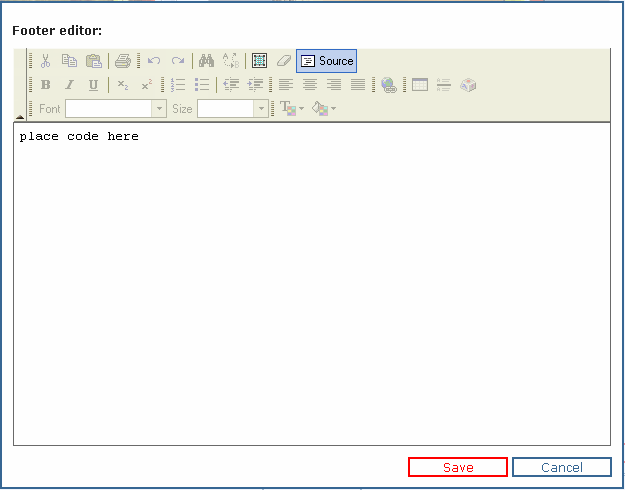
- Make sure that the "show footer" checkbox is enabled and click on Change.
- Type your text into the footer editor.
- Highlight the text that you want to hyperlink and click Insert/Edit link button.

- Insert your link into URL field and click Ok.
- Save your page.
- Now when your website visitors click on the words that you highlighted, they will go to the URL that you just specified.
How do I add a widget to my website?
A web widget is a portable chunk of code that can be installed and executed within any separate HTML-based web page by an end user without requiring additional compilation. They are derived from the idea of code reuse. Other terms used to describe web widgets include: gadget, badge, module, webjit, capsule, snippet, mini and flake. Web widgets usually but not always use DHTML, JavaScript, or Adobe Flash.
Widgets often take the form of on-screen tools (clocks, event countdowns, auction-tickers, stock market tickers, flight arrival information, daily weather etc). (Wikipedia)
You can add widgets to a home page, to your custom pages and to your slogan.
To add a widget to a home page:
- Login to your Toolkit.
- Click Website Editor and open Website Designer page.
- Click Next and then click Change link to open the footer editor.
- Click the Source button on the top pane of the editor.
- Insert your widget code, click Source again and click Save.
- Preview your changes before saving again. Sometimes, the widget may not appear as it's supposed to be within the editor - that is okay. When you logoff from your Toolkit, you can see the final widget on your web page.
To add a widget to your custom page or to your slogan, go to the corresponding page within the Website Editor and follow steps 4 and 5 mentioned above.
How do I change the order of my links on the homepage?
- Login to your Toolkit and open Website Editor page.
- Click Buttons link.
- On the left side of every page on your website there is a number assigned to the pages. Click on the number and change it. The system automatically reorders your pages.
How do I add Google™ Analytics to my website??
Once you sign up for a Google™ Analytics account, you will be given a code or script to insert into your website. To do this:
- Login to your Toolkit and open Website Editor page.
- Select Meta Tags link.
- Insert the code into the Home page additional head content box and click Save.
I have made changes to my website, but do not see them. Why?
While you surfing the web your internet browser remembers content of pages you visit. Images, sounds, texts are stored in Temporary Internet Files folder on your computer. Storing these files makes browsing the Internet faster because it takes your computer less time to display Web page when it can call up some of the page's elements or even the entire page from your local Temporary Internet Files folder. That is why it can be a reason of why you do not see changes you made to your website recently.
Clearing your cache is easy, and something you should make a regular habit. Below are instructions for clearing the cache of the most common types of web browsers. After you've completed the steps to clear your cache, please close all open browser windows, and reopen your browser.
Internet Explorer 7 and 6
- From the 'Tools' menu, choose 'Internet Options'. (The 'Internet Options' dialog box should appear).
- If the 'General' tab is not already in front, click it.
- Click the 'Delete Files' button. (The 'Delete Files' dialog box should appear).
- Check the box labeled 'Delete all offline content'.
- Click 'OK', then click 'OK' again.
Internet Explorer 5
- From the 'Tools' menu, choose 'Internet Options'. (The 'Internet Options' dialog box should appear).
- If the 'General' tab is not already in front, click it.
- Click the 'Delete Files' button. (The 'Delete Files' dialog box should appear).
- Check the box labeled 'Delete all offline content'.
- Click 'OK', then click 'OK' again.
Internet Explorer 4
- From the 'View' menu, choose 'Internet Options'. (The 'Internet Options' dialog box should appear).
- If the 'General' tab is not already in front, click it.
- Check the box labeled 'Delete all offline content'.
- Click the 'Delete Files' button. (The 'Delete Files' dialog box should appear).
- Click 'OK', then click 'OK' again.
Netscape 8
- From the 'Tools' menu, choose 'Options'. (A dialog box should appear).
- Click on 'Privacy'.
- Click the plus sign next to 'Cache' to open the menu.
- Click 'Clear' to delete the temporary Internet files.
Mozilla Firefox
- From the 'Tools' menus, choose 'Options'. (The Options window will appear).
- Click the 'Privacy' tab. (The Privacy tab has a padlock icon).
- In the Privacy window, click the 'Cache' tab.
- Click 'Clear Cache Now'. (The button will become grey temporarily. Once it is clickable again, the browser cache will be clear).
- Click 'OK' to return to your browser window.
|
|
TOP
|
|